
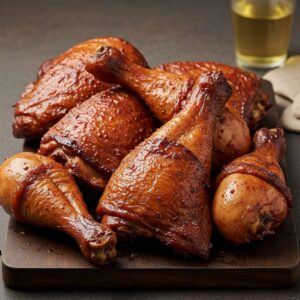
Smoked Chicken Legs and Thighs

Picture this: Smoked Chicken Legs and Thighs, kissed by the smoky embrace of your grill or smoker, with crispy skin that crackles with every bite.
If you’re on the carnivore diet or just love hearty, protein-packed meals, this recipe is about to become your new favorite. No frills, no fluff—just pure, unadulterated flavor.
And guess what? It’s surprisingly easy to make. Whether you’re a grilling newbie or a seasoned pitmaster, this recipe will guide you step-by-step to smoked chicken perfection.
Why You’ll Love This Smoked Chicken Legs and Thighs Recipe
- Rich in Flavor : The combination of smoky seasoning and slow cooking makes every bite irresistible.
- Perfect for the Carnivore Diet : Zero carbs, zero sugar—just pure protein to fuel your body.
- Versatile and Easy : You can serve this as a main dish, shred it for salads, or even use it in wraps (if you’re not strictly carnivore).
- Meal Prep Friendly : Smoke a big batch and enjoy leftovers all week long.
How to Make It
Start by prepping your chicken with a simple yet flavorful dry rub. The key is to let the spices penetrate the meat for maximum flavor.
Once seasoned, let the chicken rest while you fire up your smoker. Aim for a low-and-slow approach—around 225°F to 250°F—to ensure the meat stays juicy and tender.
Smoke the chicken until the internal temperature reaches 165°F, then crank up the heat at the end to crisp up that skin. Trust me, the results are worth the wait!
Make Ahead Method
One of the best things about this smoked chicken recipe is how easy it is to prep ahead of time. Whether you’re planning for a busy weeknight dinner or hosting a weekend gathering, these tips will save you time and effort while maximizing flavor.
Season in Advance : The dry rub is where the magic begins. After patting the chicken dry, apply the seasoning generously, making sure to coat every nook and cranny. Once seasoned, place the chicken on a wire rack (set over a baking sheet to catch any drips) and let it sit uncovered in the fridge for up to 24 hours. This process, called air-drying, helps the skin become extra crispy when smoked.

Freeze for Later : If you want to prep even further ahead, you can freeze the seasoned chicken before smoking. Place the legs and thighs in a single layer on a baking sheet and freeze until solid, then transfer them to a freezer-safe bag. When you’re ready to cook, thaw them in the fridge overnight and proceed with the recipe as usual.
Smoke and Store : Another great option is to smoke the chicken in advance and store it for later use. Once smoked, let the chicken cool completely, then store it in an airtight container in the fridge for up to 4 days or freeze for up to 3 months. To reheat, warm it gently in the oven at 300°F for 10-15 minutes, or on the stovetop with a splash of broth to keep it moist.
This flexibility makes this recipe perfect for meal preppers, busy families, or anyone who loves having delicious food ready to go.
Pro Tips
Here are some insider secrets to take your smoked chicken to the next level. These tips come from years of grilling and smoking experience, so trust me—they work!
Choose Quality Chicken : Fresh, high-quality chicken makes a world of difference. Look for organic or pasture-raised options if possible. They tend to have better flavor and juicier meat.
Pat It Dry : Moisture is the enemy of crispy skin. Always pat the chicken dry with paper towels before applying the rub. This step ensures the seasoning sticks and the skin gets that irresistible crunch.
Experiment with Wood Chips : Different woods impart unique flavors. Hickory gives a bold, smoky taste, while applewood and cherry wood add a subtle sweetness. Mix and match to find your favorite combination.
Don’t Overcrowd the Smoker : Give each piece of chicken enough space on the grill grate. Overcrowding can trap steam and prevent the skin from crisping up.
Use a Two-Zone Fire : If you’re using a charcoal smoker, set up a two-zone fire. Place the coals on one side of the grill and the chicken on the other. This indirect heat method ensures the chicken cooks evenly without burning.
Rest Before Serving : After smoking, let the chicken rest for at least 5-10 minutes before digging in. Resting allows the juices to redistribute throughout the meat, ensuring every bite is tender and flavorful.
These small tweaks can make a big impact on the final result. Don’t be afraid to experiment and find what works best for you!

Storage Options
Leftovers? Lucky you! Here’s how to store your smoked chicken:
- Refrigerator : Store in an airtight container for up to 4 days.
- Freezer : Wrap individual portions in plastic wrap, then place them in a freezer-safe bag. They’ll stay good for up to 3 months.
- Reheating : To retain moisture, reheat in the oven at 300°F for 10-15 minutes or on the stovetop with a splash of broth.
Tools For This Recipe
Having the right tools makes all the difference:
- Smoker or Grill : A pellet smoker, charcoal smoker, or even a gas grill with a smoker box works perfectly.
- Meat Thermometer : Essential for ensuring your chicken is cooked to perfection.
- Tongs : For flipping and handling the chicken without tearing the skin.
- Mixing Bowls : For preparing your dry rub.
- Wire Rack : If you’re air-drying the chicken in the fridge, place it on a wire rack to prevent sticking.
FAQs
Q: Can I use chicken breasts instead of legs and thighs?
A: Absolutely! Just keep in mind that chicken breasts cook faster and can dry out if overcooked. Stick to the same internal temperature of 165°F.
Q: Do I need to flip the chicken while smoking?
A: Not necessarily. Flipping can help with even cooking, but if your smoker has consistent heat distribution, it’s not required.
Q: How do I know when the chicken is done?
A: Use a meat thermometer to check the internal temperature. It should read 165°F in the thickest part of the meat.
Q: Can I smoke frozen chicken?
A: It’s best to thaw the chicken first. Smoking frozen chicken can lead to uneven cooking and food safety concerns.
Variations and Substitutions
- Spice It Up : Add cayenne pepper or smoked paprika to the rub for a kick of heat.
- Herb Lover’s Delight : Mix in dried rosemary, thyme, or oregano for an herby twist.
- Lemon Zest Magic : Rub some lemon zest on the chicken before smoking for a bright, citrusy note.
Final Thoughts: Why Smoked Chicken is a Game-Changer
There’s something magical about smoked chicken—it’s comforting, flavorful, and oh-so-satisfying. Whether you’re following the carnivore diet or just looking for a delicious way to enjoy chicken, this recipe delivers on all fronts. Plus, it’s versatile enough to fit into any meal plan.

So, fire up that smoker, grab your favorite seasoning blend, and give this recipe a try. I’d love to hear how it turns out for you! Drop a comment below and share your thoughts—or better yet, post a photo of your masterpiece. Happy smoking!
Smoked Chicken Legs and Thighs Carnivore Recipe
Ingredients
- 4 chicken legs
- 4 chicken thighs
- 1 tablespoon salt
- 1 tablespoon black pepper
- 1 tablespoon garlic powder
- 1 tablespoon onion powder
- 1 tablespoon smoked paprika
- 1 teaspoon cayenne pepper optional
- 1 teaspoon dried thyme
Instructions
Step 1: Prep the Chicken
- Start by gathering your chicken legs and thighs. Pat them dry with paper towels—this is crucial for getting that crispy skin. If the chicken feels wet or slippery, the seasoning won’t stick properly, and the skin won’t crisp up during smoking. Take your time with this step; it’s worth it.
- Once the chicken is dry, lay it out on a clean cutting board or tray. Now it’s time to season. Grab a small bowl and mix together your dry rub ingredients: salt, black pepper, garlic powder, onion powder, smoked paprika, cayenne pepper (if you like a little heat), and dried thyme. Stir everything together until well combined.
Step 2: Apply the Dry Rub
- Generously sprinkle the dry rub over the chicken, pressing it into the skin and flesh. Don’t be shy here—the seasoning is what gives the chicken its bold flavor. Make sure to coat all sides evenly, including the undersides and any crevices. If you’re prepping ahead, place the seasoned chicken on a wire rack set over a baking sheet and refrigerate uncovered for up to 24 hours. This air-drying step is optional but highly recommended for extra crispy skin.
Step 3: Preheat the Smoker
- While the chicken rests, it’s time to get your smoker ready. Set it to a low temperature between 225°F and 250°F. Low and slow is the key to tender, juicy meat. Add your choice of wood chips—hickory, applewood, or cherry wood are all excellent options. Each type of wood adds its own unique flavor profile, so feel free to experiment.
- If you’re using a pellet smoker, simply load the hopper with pellets and set the temperature. For charcoal smokers, light the coals and let them burn down until they’re covered with a thin layer of white ash. Then, scatter the wood chips over the coals. If you’re using a gas grill, place the wood chips in a smoker box or wrap them in aluminum foil with holes poked in it.
Step 4: Smoke the Chicken
- Once the smoker is preheated and producing steady smoke, place the chicken on the grill grate, skin side up. Arrange the pieces so they’re not touching—this ensures even cooking and prevents steaming. Close the lid and let the smoker work its magic.
- Smoke the chicken for about 1.5 to 2 hours, or until the internal temperature reaches 165°F in the thickest part of the meat. Use a meat thermometer to check the temperature. Insert the probe into the thickest part of the thigh or leg, avoiding the bone, which can give an inaccurate reading.
- During this time, resist the urge to open the smoker lid too often. Every time you lift the lid, you lose heat and smoke, which can extend the cooking time. Trust the process—it’s worth the wait.
Step 5: Crisp the Skin
- Once the chicken reaches 165°F, crank up the heat to 375°F for the final 10-15 minutes. This step is essential for achieving that golden-brown, crispy skin. Keep an eye on the chicken to make sure it doesn’t burn, but don’t skip this step—it’s what takes the dish from good to great.
Step 6: Rest and Serve
- When the chicken is done, remove it from the smoker and let it rest on a cutting board or platter for 5-10 minutes. Resting allows the juices to redistribute throughout the meat, ensuring every bite is moist and flavorful. While the chicken rests, take a moment to admire your handiwork. That smoky aroma? Pure perfection.
- Finally, serve the chicken hot with your favorite sides—or enjoy it on its own if you’re following the carnivore diet. Either way, it’s a meal that’s sure to satisfy.
Notes
Calories: 320
Protein: 45g
Fat: 15g
Carbohydrates: 0g
Fiber: 0g
Sugar: 0g


